How to Replace Wheel Bearings on a Car
Wheel bearings are vital to the safe operation of any vehicle. These small components particularly ‘bear’the load of a mounted tire/wheel assembly as they work to reduce friction whenever the wheel rotates. Even as important as these components are to our car, unfortunately, many motorists are completely ignorant of when they need to replace wheel bearings of their car until their mechanic suggest so.
Just like your wheels themselves, the wheel bearings are also important and shouldn’t be taken for granted because they will need replacement at some stage. Therefore, when your mechanic suggests you replace them, don’t ignore the warning!
Though in most cases wheel bearing replacement is best left to the pro’s, it is a job that can be done by a competent DIYers when the right tools are available. In this article, I am going to be showing you some tips that can make it easy for you to replace your wheel bearings all by yourself and right in the comfort of your home. So let’s go!
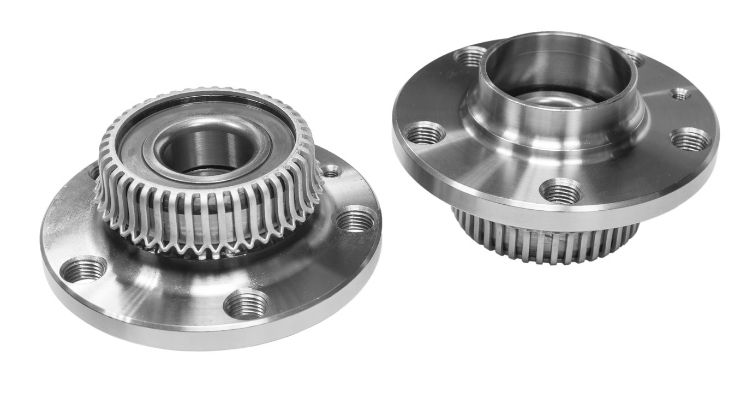
What Exactly Are Wheel Bearings?
Wheel bearings are the parts that make it possible for the wheels of your car to spine freely with little or friction at all. these set of steel balls are housed in a metal case which is known as the race and located right inside the wheel’s hub. whenever you hear a humming or moaning sound while driving, chances are that the wheel bearings of your car are beginning to fail.
Why Do Wheel Bearings Fail?
Although bearings can last 100,000 miles or even more, there are chances that these mechanical elements can wear out over time. As bearings cool off after use, the air, contracting metal, and lubricant can form a vacuum that is hopefully held by seals. When the seals can no longer hold the vacuum, the sealed hub unit or the bearings suck in air, water, and debris from the outside. And in some countries where salts are applied on the road, it’s usually as bad on the wheel bearings as ocean water.
As the circulation of these contaminants continues through the grease and between the races and bearings, the components begin to wear and also change metallurgy.
What Are the Signs That You Need to Replace Your Wheel Bearings?
There are several signs and symptoms that could show that your wheel bearings need a replacement. While some may be difficult to detect which often result in damage before you can correct them, there are some that you can easily discover and do the needful. Unusual noise has been a classic sign of a bad wheel bearing or bad wheel hub bearing. Below are some indicators that may be telling you it’s time to replace your wheel bearing:
- Clicking, snapping or popping when making sharp turns
- Grinding when your vehicle is in motion
- Knocking or clunking usually when changing directions, such as from forward to reverse
- Humming, growling or rumbling vibration or noise when driving on a straight line, but increases when you tend to slightly turn the steering wheel to the left or right
- Abnormal side pull when you apply the brakes
- Shudder, shimmy or vibration at a constant speed
- Uneven brake pad or rotor wear
- Unevenor abnormal tire wear
How Do You Replace Wheel Bearings of a Car?
As earlier said, changing the wheel bearings of your car is what you can do by yourself when you have some specialty mechanic tools. Here, I have provided some steps which are all perfect for the three most common types of wheel bearings that can be found on a vehicle. So be sure to identify the type of wheel bearing your car has by getting the manual close before you start the repair.
Preparing Your Car for The Wheel Bearing Replacement
#1: park your car on a flat surface and put chocks behind the wheels:
You will need a wheel chock to block the tire directly opposite the wheel you are trying to work on first. If you are changing the front wheel on the driver’s side, you will need to use a chock at the passenger rear wheel.
#2: Loosen the lug nuts:
Get your ½ inch ratchet bearing the appropriate size socket for the lug nuts. Loosen the lug nuts on the tire you want to remove but be careful not to remove them completely yet.
#3: lift up the vehicle:
Using the floor jack and a pair of safety jack stands, lift and secure the car in order for you to safely remove the tire.
#4: Now remove the lug nuts:
remove the nuts completely now that the car is lifted and secured.
Installing The New Wheel Bearings
#1: remove the bracket and the bracket caliper
With your 3/8 socket set and your ratchet, unbolt the bracket and the disc brake caliper from the spindle. You can make use of a screwdriver to remove the caliper itself. However, when you are removing the caliper, do it with extra care so it doesn’t dangle freely and damage the flexible brake line.
#2: Get the outer wheel bearing removed
If the disc brake rotor is housing your wheel bearings as often seen in some cars like trucks, it may be required that you try to pry off the central dust cap to the cotter pin and retaining nut can be exposed. You can easily do this by removing the cotter pin and retaining nut using your pliers and after that, slide the rotor forward so the outer wheel bearing can be released.
#3: it’s time to remove the inner wheel bearing and the rotor
Replace the retaining nut on the spindle, and with both hands, grab the rotor. Try to pull the rotor off the spindle, letting the larger inner bearing to get caught on the retaining nut, and then release the bearing and grease seal from the rotor.
#4: rub bearing grease on the casing
Let the rotor lie face down on the floor with its back side facing upwards. Rub the bearing grease into the casing of the new larger bearing.
#5: now install the new bearing
Carefully place the new bearing into the back of the rotor and apply some grease to the inside bearing cavity. Use a rubber mallet to tap the new bearing seal over the larger one and slide the rotor back on to the spindle.
Get the new smaller bearings also and pack them with grease. Slide it on the spindle inside the rotor. Now install the retaining nut andthrust washer onto the spindle.
#6: install a new cotton pin
Tighten the retaining nut until it’s snug and at the same time, also turn the rotor counterclockwise. Tighten the retaining nut and then install a new cotter pin.
Reassemble
#1: put the caliper and brake rotor back on
Now that you have installed the new bearing, the caliper and brake rotor can be placed back unto your car by making use of a ratchet and the appropriate sockets you used in removing them in the first place.
#2: install back your tire
Put back the wheel and tighten the lug nuts with your hand. Use a floor jack to support the vehicle and remove the safety jack stands. Gently lower the car until the tires are finally on the ground.
#3: finish up the installation
Now use a torque wrench to tighten the lug nuts according to the manufacturer’s specifications. Then completely lower the vehicle and remove the floor jack.
That’s it! You have just successfully replaced the wheel bearings on your car. You should now perform a test drive to ensure the repair is complete. If you face any problems while getting your bearings changed, it is recommended you immediately call on your mechanic to do the replacement for you. Bet remember it isn’t a rocket science to replace wheel bearings on a car!