How to Put down Seats in Toyota Camry
To put down the seats in a toyota camry, locate the seat release lever or button and push or pull it, depending on the model. Then, fold the seatback forward or down to create additional cargo space.
The toyota camry is a popular sedan known for its comfortable interior and spaciousness. However, there may be instances when you need to transport bulky items or luggage that won’t fit in the trunk alone. In these situations, learning how to put down the seats can be incredibly useful.
By properly folding down the seats, you can optimize the available space in your camry and conveniently transport larger items. In this guide, we will walk you through the simple steps to put down the seats in your toyota camry, making the process quick and hassle-free.
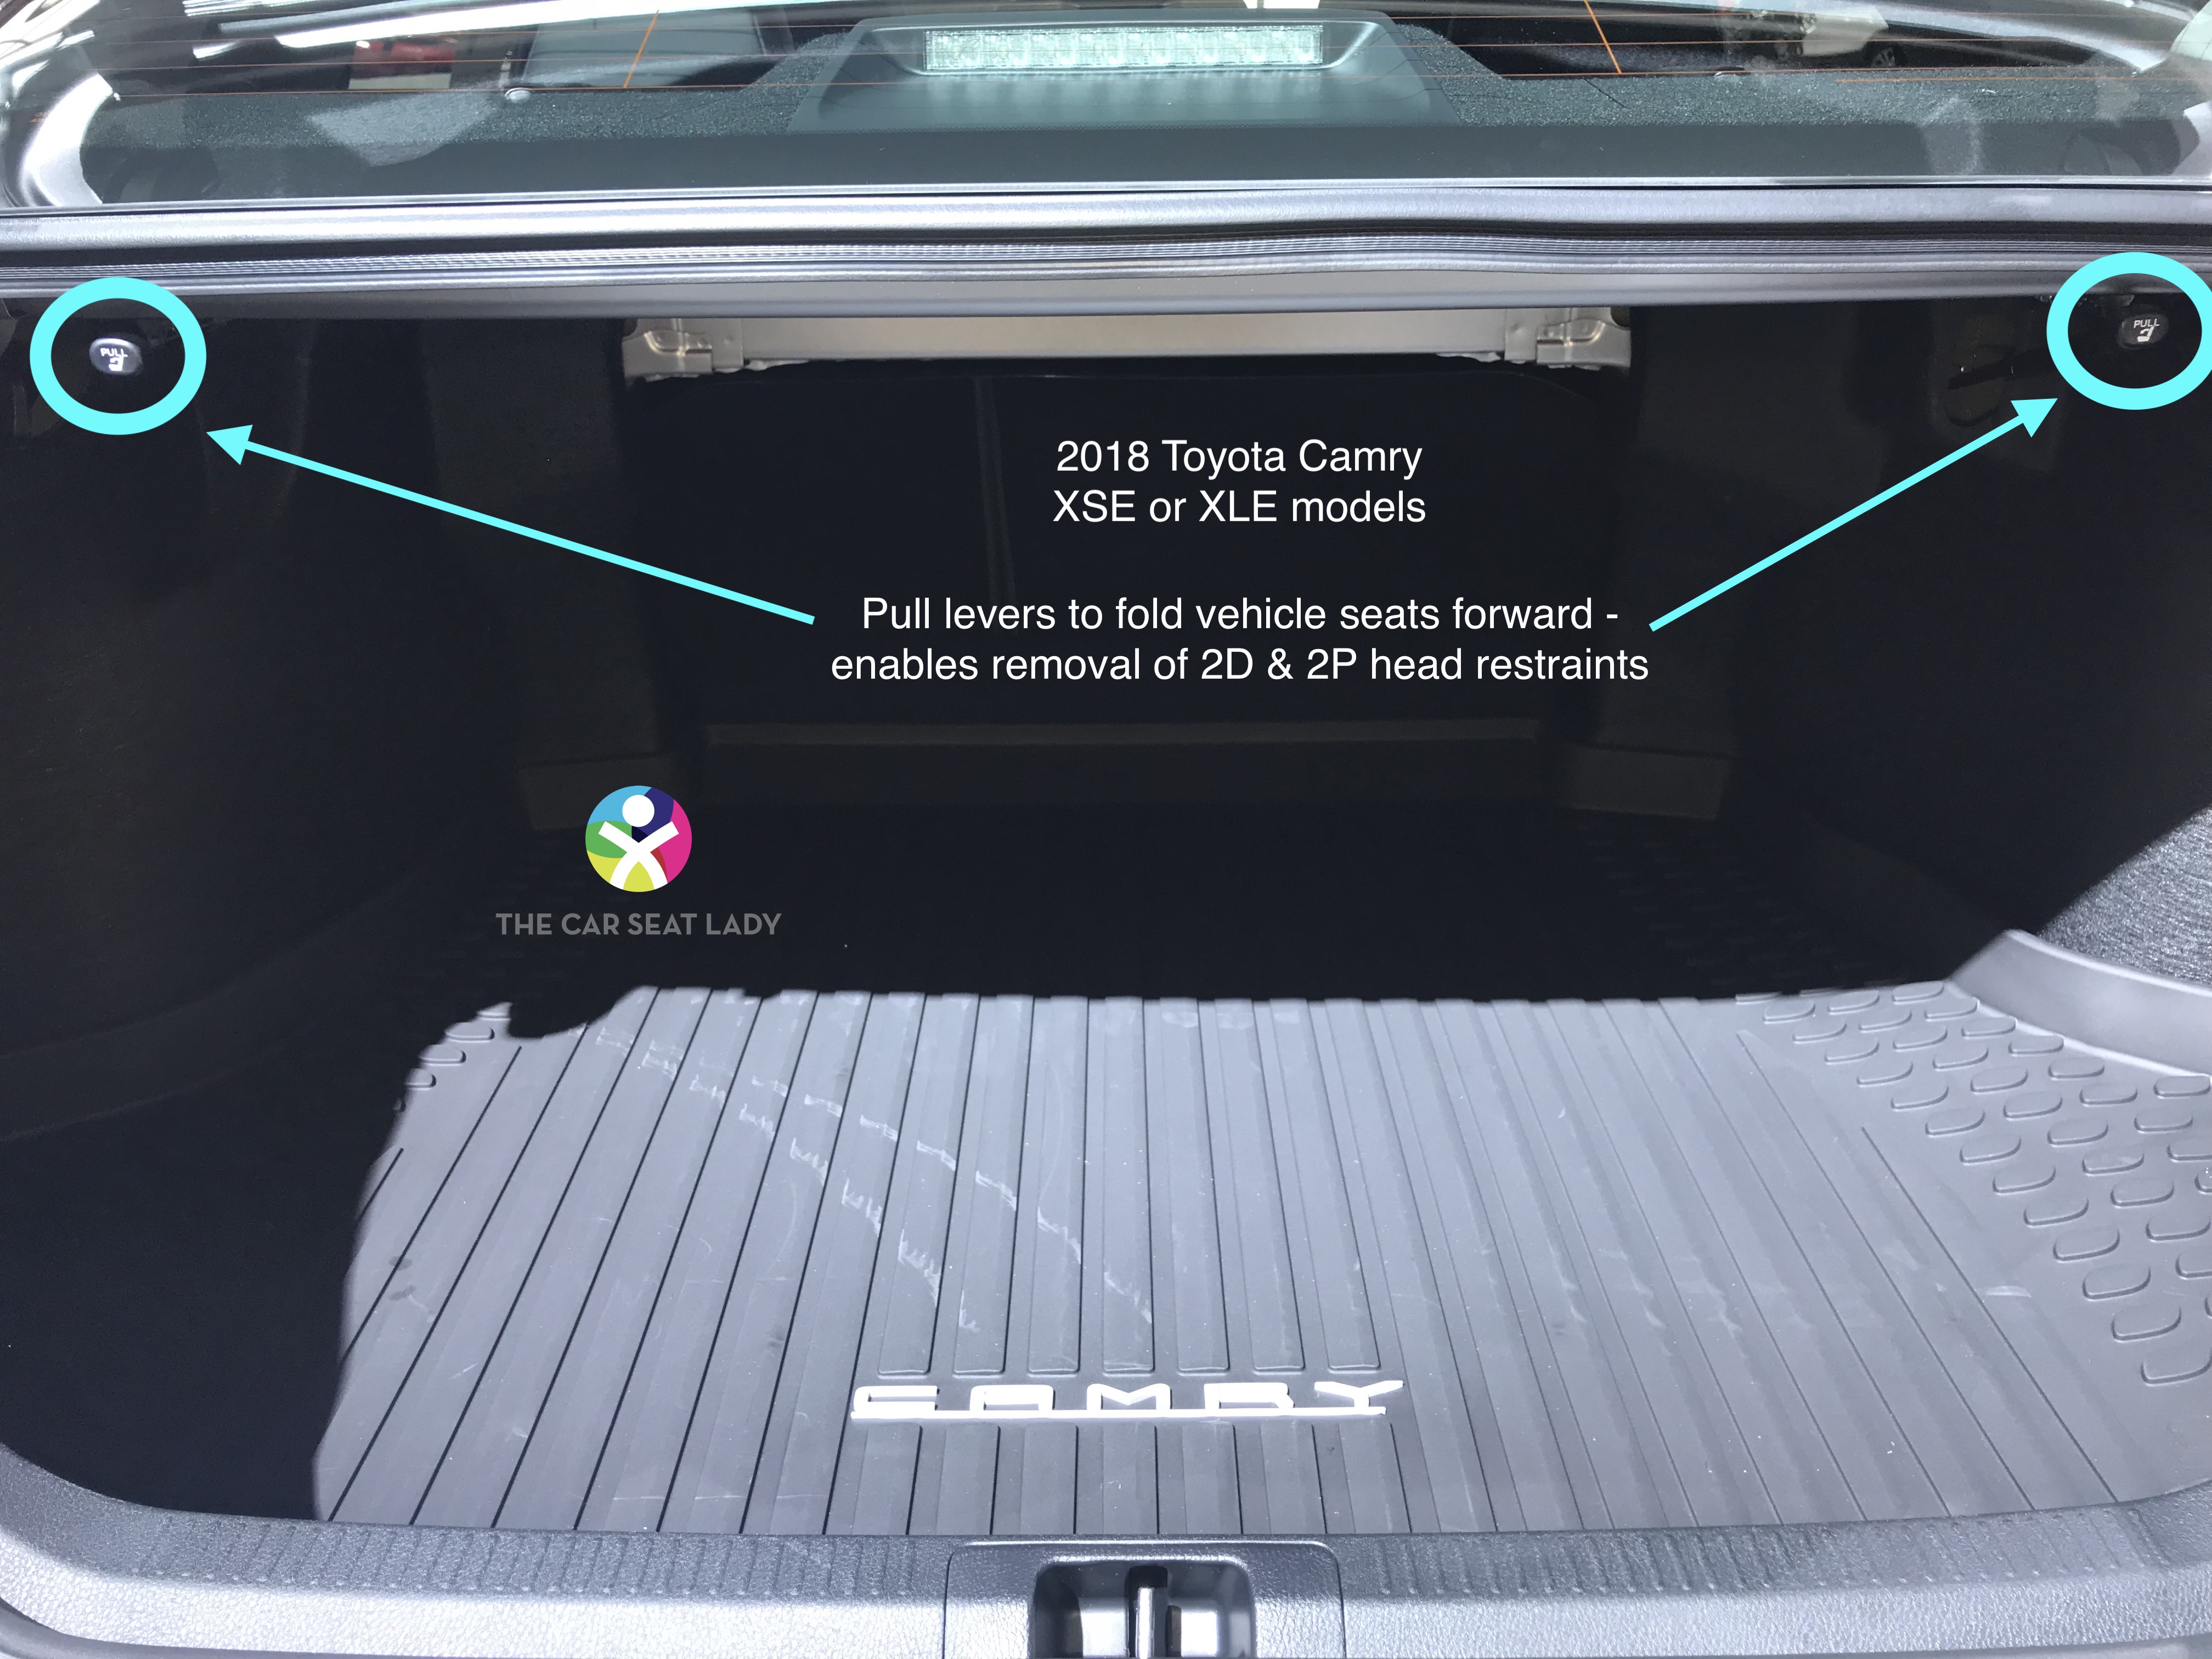
Credit: thecarseatlady.com
Preparing For Seat Removal
Before you begin the process of removing seats in your toyota camry, it is important to properly prepare to ensure a smooth and hassle-free experience. Taking a few simple steps can help you avoid any unexpected issues. Here’s what you need to do:
Checking For Any Loose Items Or Debris:
- Carefully inspect the seat and its surrounding area for any loose items or debris that may obstruct the process of removing the seat.
- Remove any loose objects such as coins, pens, or small personal belongings that may have accumulated under the seat.
- Ensure that there are no obstacles or debris that may hinder the seat’s movement during the removal process.
Moving The Seat To Its Furthest Position:
To facilitate better access and ease of removal, it is recommended to move the seat to its furthest position. Follow these steps:
- Locate the seat adjustment lever, usually located on the lower front side of the seat.
- Pull the lever to release the seat lock mechanism.
- Gently push the seat backward to move it as far back as possible.
- Ensure that the seat is securely in place before proceeding to the next step.
Raising The Seat To Its Highest Position:
Raising the seat to its highest position can provide additional space and maneuverability when removing the seat. Here’s how you can do it:
- Locate the seat height adjustment lever, typically located on the lower front side of the seat.
- Pull the lever to release the seat height adjustment mechanism.
- Slowly raise the seat by pushing it upwards until it reaches its highest position.
- Confirm that the seat is firmly locked in its elevated position before proceeding further.
By following these simple steps and preparing adequately, you are now ready to proceed with the process of seat removal in your toyota camry. Stay tuned for the next part of this blog post, where we will guide you through the actual seat removal process.
Remember, safety is paramount, so exercise caution while handling seats and ensure that you have read the manufacturer’s instructions before attempting any repairs or modifications.
Accessing The Seat Mounting Bolts
When it comes to putting down seats in your toyota camry, one of the essential steps is accessing the seat mounting bolts. These bolts secure the seats to the vehicle floor, and removing them is necessary to disassemble the seats.
In this section, we will guide you through locating the seat mounting bolts, using the appropriate tools to remove them, and ensuring that you keep track of the bolts and washers.
Locating The Seat Mounting Bolts:
- Start by sliding the front seats all the way back to expose the rear bolts and then slide them all the way forward to access the front bolts.
- Look for the bolt covers located at the base of each seat. These covers are designed to conceal the bolts for a more streamlined appearance.
- Gently pry off the bolt covers using a flathead screwdriver or a plastic trim removal tool.
- Once the covers are removed, you will see the seat mounting bolts attached to the floor of the car.
Using Appropriate Tools To Remove The Mounting Bolts:
- Grab a socket wrench with the correct size socket that fits the seat mounting bolts.
- Attach the socket to the wrench and position it securely on the bolt head.
- Turn the wrench counterclockwise to loosen the bolt. Depending on the tightness, you may need to apply some force to break the initial resistance.
- Continue unscrewing the bolt until it is completely removed.
Keeping Track Of The Bolts And Washers:
- As you remove the bolts, place them in a container or tray to keep them organized. It will help you avoid misplacing any bolts during reassembly.
- Additionally, add each corresponding washer to the container as you remove the bolts. This step is crucial as the washers ensure proper alignment and stability.
- Consider labeling the container or using separate compartments to distinguish between the front and rear bolts for easy identification later.
By following these steps, you will be able to access the seat mounting bolts in your toyota camry correctly. Remember to locate the bolts, use the appropriate tools to remove them, and keep track of the bolts and washers for a smooth disassembly process.
Disconnecting Electrical Connections For Powered Seats
Disconnecting the electrical connections for powered seats in your toyota camry requires careful attention and proper handling to avoid any damage or mishaps. Here are the steps you need to follow:
Identifying electrical connectors for powered seats:
- Locate the electrical connectors underneath the seat: These connectors are usually located towards the front or side of the seat. You may need to adjust the seat position for better access.
- Check for plastic clips or locks: Most electrical connectors have these clips or locks that secure them in place. Look for any visible signs of clips or locks before disconnecting.
Disconnecting the electrical connectors carefully:
- Gently release the clips or locks: Use your fingers or a small flat-head screwdriver to release the clips or locks holding the connectors in place. Take your time, and be cautious not to break them.
- Pull the connectors apart: Once the clips or locks are released, firmly grip the connectors on either side and gently pull them apart. Avoid pulling on the wires themselves to prevent damage.
Securing loose wires to prevent damage:
- Organize and secure loose wires: After disconnecting the electrical connectors, you might have some loose wires hanging around. It’s crucial to secure them properly to prevent any potential damage or interference.
- Use zip ties or electrical tape: Gather the loose wires together and use zip ties or electrical tape to secure them into a neat bundle. This helps prevent them from getting tangled or caught during the seat installation process.
Remember, when working with electrical connections, it’s essential to take precautions and handle everything with care. By following these steps, you can safely disconnect the electrical connections for powered seats in your toyota camry without any issues.
Detaching The Seat From The Tracks
Sliding the seat forward or backward to access the tracks:
- Adjust the seat position by sliding it forward or backward using the lever located on the side of the seat. This will allow you to gain better access to the tracks.
Releasing the locking mechanisms on the tracks:
- Locate the locking mechanisms positioned on both sides of the seat tracks. These mechanisms secure the seat to the tracks and need to be released before detaching the seat.
- Press the release lever, typically found at the front of the seat tracks, to unlock the mechanism. Repeat the process for the opposite side.
- Make sure both locking mechanisms are fully disengaged before proceeding to the next step.
Lifting the seat to detach it from the tracks:
- Firmly grip the seat with both hands, placing one hand on each side.
- Lift the seat upwards, taking care not to strain your back. The seat should detach from the tracks with a slight upward movement.
- Once the seat is lifted and detached from the tracks, carefully set it aside in a safe location.
Remember, always exercise caution and follow the manufacturer’s instructions when detaching seats in your toyota camry. By following these steps, you’ll be able to easily detach the seat from the tracks, allowing for repairs or modifications as needed.
Removing The Seat From The Vehicle
Ensuring A Clear Path For Removing The Seat:
- Before starting the process of removing the seat from your toyota camry, make sure to create a clear path by removing any obstacles or items that might hinder access to the seat.
- Remove any loose articles, such as water bottles or trash, from the area around the seat.
- Clear the floor area of any debris or objects that could get in the way during the removal process.
- Ensure that the seat belt is in its proper position and not tangled or obstructing the removal process.
Tilting The Seat To A Suitable Angle For Removal:
- Once you have ensured a clear path, you can proceed to tilt the seat to a suitable angle for removal.
- Locate the lever or mechanism that allows you to adjust the angle of the seatback and move it forward as much as possible.
- Tilt the seatback forward, ensuring that it is stable and locked in place.
- By tilting the seat forward, you create more space for maneuvering and lifting the seat out of the vehicle.
Lifting The Seat Out Of The Vehicle:
- Now that the seat is in a suitable angle, it’s time to lift it out of the vehicle.
- Position yourself at the side of the seat that is closest to the center console.
- Place one hand on the seat frame near the base and the other hand on the backrest.
- With a firm grip, lift the seat upward, being cautious of its weight and any wiring or connectors that may be attached.
- Carefully maneuver the seat out of the vehicle, ensuring it clears the door frames and any other obstructions.
- Remember to maintain proper posture and use your leg muscles to lift, avoiding strain or injury to your back.
By following these steps, you can successfully remove the seat from your toyota camry, allowing for repairs, upgrades, or additional space as needed.
Storing And Reinstalling The Seat
Finding a safe and convenient storage space for the seat:
- Identify a suitable storage location to prevent damage to the seat and ensure easy access for reinstallation.
- Consider storing the seat in a dry and secure area, such as a garage or storage room, to protect it from environmental elements.
- Take measurements of the seat before storing to ensure it fits securely in the chosen storage space.
- If necessary, fold down the seat or remove any attachments to optimize storage efficiency.
Preparing the vehicle for seat reinstallation:
- Begin by cleaning the area where the seat will be reinstalled, removing any debris or dirt.
- Inspect the seat mounting points in the vehicle to ensure they are clean and undamaged.
- Confirm that all seat belts and other seat components are in proper working order before starting the reinstallation process.
- If necessary, refer to the vehicle’s manual for specific instructions or precautions related to seat installation.
Reversing the steps to reinstall the seat securely:
- Align the seat with the mounting points in the vehicle, ensuring that it is properly positioned.
- Gently push the seat towards the mounting points, ensuring that it slides in smoothly and securely.
- Locate the seat bolts or latches and tighten them securely, using the appropriate tools if necessary.
- Double-check that the seat is securely fastened and does not move or wobble.
- Test the seat adjustments, such as reclining or sliding, to ensure they function properly.
- Finally, secure all seat belts and check that they are in good condition and properly functioning.
Remember, properly storing and reinstalling the seat in your toyota camry ensures a safe and comfortable driving experience. Take the necessary precautions and follow the manufacturer’s instructions to maintain optimum seating quality.
Testing The Seat After Installation
Once you have successfully installed the seats in your toyota camry, it is crucial to test their alignment, stability, and functionality. This step is essential to ensure your safety and comfort while driving. Here’s what you need to do:
Verifying Proper Seat Alignment And Stability:
- Sit in the driver’s seat and check if it is centered properly. The seat should be aligned with the steering wheel to ensure easy access to all the controls.
- Focus on the seat’s base and backrest. Make sure they are securely attached and do not wobble or move excessively.
- Adjust the seat position to your preferred driving position and ensure it locks firmly into place.
- Test the recline function of the seat. It should smoothly move backward and forward without any resistance or sudden jerks.
- Lean back against the backrest and check for stability. It should firmly support your back without excessive give or discomfort.
Checking For Any Functionality Issues:
- Test the seat height adjustment feature. Ensure that the seat can be raised or lowered according to your preference.
- Adjust the headrest position and confirm that it offers proper support for your head and neck.
- Check the seat’s lumbar support feature, if available. Make sure it can be adjusted to provide adequate lower back support.
- Test the seat heating or cooling functions, if applicable. Ensure they operate effectively and distribute heat or cool air evenly.
- Engage the seatbelt and check if it locks properly. It should retract smoothly and hold you securely in place.
Making Necessary Adjustments If Required:
- If you notice any misalignment, instability, or functionality issues during the testing process, you may need to make some adjustments.
- Refer to the seat installation manual provided by toyota for specific instructions on making adjustments.
- Pay attention to the bolts and fasteners that secure the seats. Ensure they are tightened correctly to prevent any movement or loosening.
- Seek professional assistance from a certified toyota technician if you are unsure or uncomfortable making adjustments yourself.
Remember, thoroughly testing your newly installed seats is crucial to ensure they are aligned correctly, stable, and functioning optimally. By following these steps, you can enjoy a safe and comfortable driving experience in your toyota camry.
Frequently Asked Questions For How To Put Down Seats In Toyota Camry
How Do You Put Down The Seats In A Toyota Camry?
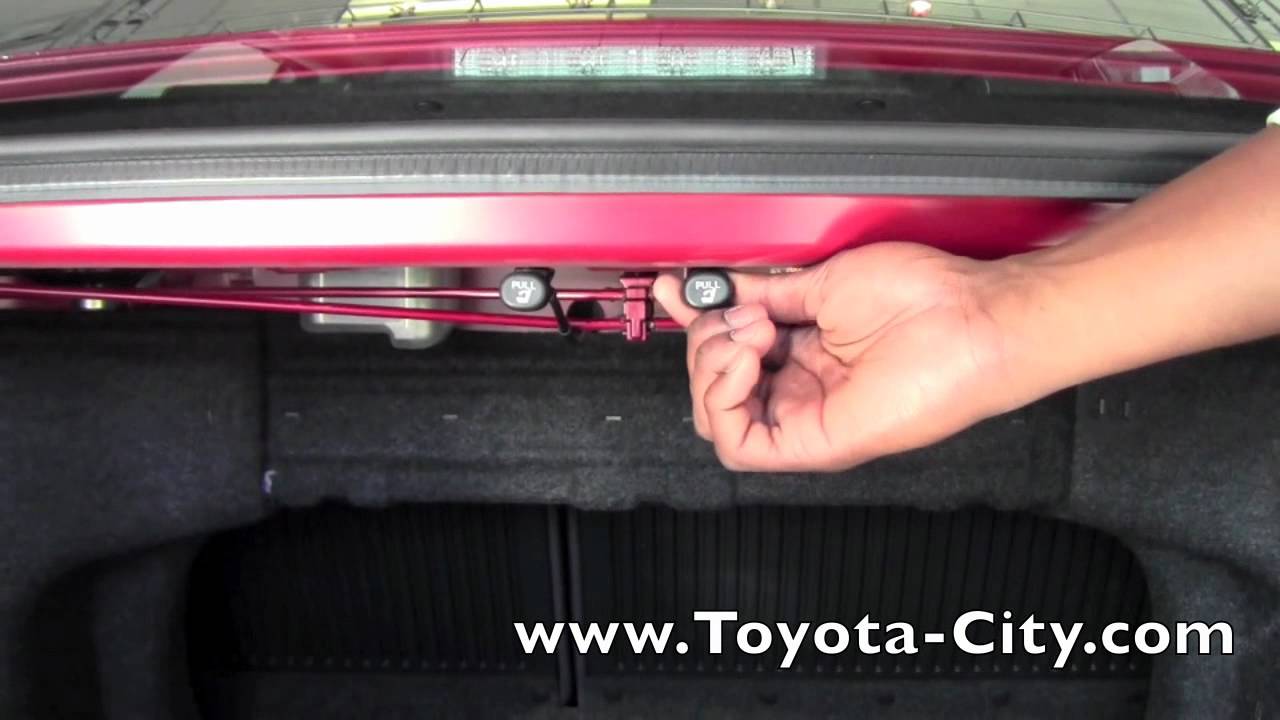
To put down the seats in a toyota camry, locate the release lever on the rear seat back. Pull the lever to release the seat back, then push it forward until it locks in place. To put down the rear seats, lift the seat cushion, locate the release strap, and pull it to fold the seats flat.
Can I Put Down Only One Seat In A Toyota Camry?
Yes, you can put down only one seat in a toyota camry. Each rear seat in a camry has its own release lever, allowing you to fold down one seat at a time. This provides added flexibility when you need to transport longer items while still accommodating passengers.
How Can I Fold Down The Rear Seats In A Toyota Camry?
Folding down the rear seats in a toyota camry is simple. Lift the seat cushion and locate the release strap on each side. Pull the strap to fold the seats down flat. This creates a larger cargo area, making it easier to transport larger or bulkier items in your camry.
Conclusion
To sum it up, putting down seats in a toyota camry is a relatively simple process that can greatly enhance the versatility and convenience of your vehicle. Whether you need to create more cargo space for transporting large items or simply want to increase passenger comfort, learning how to put down the seats in your camry is a valuable skill.
By following the steps outlined in this guide, you can confidently and efficiently fold down the seats in your camry whenever the need arises. Remember to always prioritize safety and proper seating arrangements when using your vehicle. With a little practice, you’ll be able to master this skill and enjoy the added convenience it brings to your toyota camry journeys.
So go ahead and give it a try!